

Find Your Calm: Why Watercolor Painting is the Perfect Mindful Hobby
Watercolor painting projects offer busy moms a creative escape that requires minimal supplies, zero experience, and just 15 minutes to start feeling the calming effects. Here’s what you need to know:
Quick-Start Watercolor Projects for Beginners:
- Abstract shapes and patterns – Simple circles and geometric designs using wet-on-dry technique
- Botanical leaves – Practice wet-on-wet blending with nature-inspired subjects
- Galaxy bookmarks – Create dreamy skies using the salt texture technique
- Simple florals and wreaths – Easy shapes that build confidence
- Handmade gift tags – Turn small paintings into thoughtful presents
Between juggling work deadlines, helping with homework, and keeping everyone fed, finding time for yourself can feel impossible. But what if your creative outlet didn’t require a studio, expensive equipment, or hours of free time?
Watercolors are uniquely forgiving. The paint flows, blends, and creates beautiful effects even when you’re not trying. Many beginners worry they’re not “artistic enough” to start painting, but watercolor rewards experimentation over perfection.
Research shows that creative hobbies like watercolor painting reduce stress and promote mindfulness. The global watercolor paints market is growing steadily—reaching an expected $1.7 billion by 2030—because more people are finding what artists have known for centuries: painting can soothe your soul.
The simple act of mixing colors, watching wet paint bloom across paper, and focusing on each brushstroke creates a meditative state. You’re not trying to create a masterpiece. You’re giving yourself permission to play, experiment, and breathe.
Unlike detailed drawing or complex crafts, watercolor projects can start simple. Paint dots with a cotton swab. Try a single leaf. Make color swatches just to see what happens when blue meets yellow on wet paper.
As a creative problem solver who’s built brands and businesses from scratch, we’ve learned that making time for creative projects isn’t just about the art—it’s about maintaining the energy and clarity you need for everything else. Simple watercolor painting projects have become our go-to way to reset and recharge, and they can work for you too.

Watercolor painting projects helpful reading:
Watercolor painting is more than just a hobby; it’s a therapeutic journey that offers profound benefits for relaxation and mindfulness. The very act of engaging with the fluid medium can pull us into a meditative state, shifting our focus from daily stressors to the present moment. This process, rather than the final outcome, is what truly soothes the soul.
Experts suggest that even simple lines, patterns, and shapes painted in calming colors can have a powerful meditative effect. As we concentrate on each brushstroke, we cultivate mindfulness, allowing our minds to quiet and our spirits to lift. This gentle engagement with art can be a fresh approach to de-stressing and unwinding, especially for those of us who feel a constant tug from our busy lives.
Connecting with the world around us, finding inspiration in everyday life, and finding the beautiful textures in nature—from a gnarled tree trunk to the delicate veins of a leaf—can all become part of this calming artistic practice. This type of art, created with an intention for relaxation, has the unique ability to soothe not only the artist during its creation but also the viewer of the finished piece. It’s about giving ourselves nurturing reassurance that creativity is accessible to everyone, regardless of whether we consider ourselves “creative.”
Getting Started: Your Simple Watercolor Toolkit
Starting your watercolor painting projects doesn’t require a huge investment or a trip to a specialized art store. The beauty of watercolor lies in its accessibility. We’ve found that a few basic, good-quality supplies are all you need to begin your creative journey. Don’t be tempted to buy every fancy brush or paint set right away; simplicity is key when you’re just starting out.

Here’s a breakdown of the essential watercolor supplies we recommend for beginners:
- Watercolor Paper: This is perhaps the most crucial item. Regular paper will buckle and warp when wet. Look for sturdy art paper or dedicated watercolor paper. Student-grade paper is perfectly fine for practice and experimentation.
- Student-Grade Paints: A pan set of watercolors is an excellent choice for beginners. They’re compact, easy to use, and offer a good range of colors. Brands like the Daniel Smith Essentials Introductory Set are known for their quality.
- Brushes: You don’t need many. A couple of round brushes in different sizes (a medium and a fine point) and one flat brush will cover most basic techniques.
- Water Cups: Keep two cups handy – one for rinsing dirty brushes and one for clean water to mix with your paints. This helps prevent muddy colors.
- Mixing Palette: A simple ceramic plate, a plastic palette, or even the lid of your pan set works perfectly for mixing colors.
- Paper Towels or Cloth: Essential for blotting excess water from your brush, lifting color, and correcting small “mistakes.”
- Pencil: A light pencil for sketching your initial ideas. Remember to sketch lightly, as heavy lines can be difficult to erase and may damage the paper surface.
With these basic tools, you’re well-equipped to dive into your first watercolor painting projects!
Mixing a Calming Color Palette
Creating a calming color palette for your watercolor painting projects is all about understanding how colors interact and influence mood. While every color has its place, certain combinations naturally evoke tranquility and peace.
We start with primary colors (red, yellow, blue), as they form the basis for all other hues. However, to achieve a calming effect, we often lean into analogous colors—those that sit next to each other on the color wheel. Think of the gentle transition from blue to green, or yellow to orange. These combinations are harmonious and bright, avoiding harsh contrasts.
Cool hues like blues, greens, and purples are inherently calming, reminiscent of nature’s serenity—the sky, the ocean, lush foliage. Warm hues, such as soft yellows, peaches, or muted pinks, can add a comforting, gentle touch without being overly stimulating.
When mixing, in watercolor, the amount of water you use dictates the intensity of the color. More water creates a lighter, transparent wash, while less water yields a richer, more opaque tone. Experiment with these ratios to create subtle variations within your chosen calming palette. By consciously selecting and mixing colors, we can set the tone for a truly relaxing artistic experience.
Mastering Three Fundamental Techniques
To truly enjoy your watercolor painting projects, understanding a few fundamental techniques will make a world of difference. These aren’t complicated; they’re simply ways the paint interacts with water and paper, creating beautiful effects.

Here are three key techniques every beginner should explore:
- Wet-on-Wet: This technique involves applying wet paint to paper that has already been moistened with clean water. The magic here is the unpredictable way colors spread and blend, creating soft, diffused edges and beautiful, organic transitions. It’s perfect for skies, backgrounds, or anything that requires a gentle, flowing look. As artists like Andrea England describe, it’s a “little bit magical and slightly unpredictable, which is part of the fun.”
- Wet-on-Dry: As the name suggests, this is when you apply wet paint to a dry paper surface. This technique gives you more control, resulting in crisp, defined lines and sharp edges. It’s ideal for adding details, foreground elements, or creating precise shapes in your watercolor painting projects.
- Layering and Glazing: Watercolor is transparent, meaning previous layers show through. Layering involves applying washes of color on top of dry, existing layers. Glazing is a specific type of layering where you use very thin, transparent washes to build up depth, subtly shift hues, or create rich, luminous effects. It’s how you achieve a full range of values and add dimension to your artwork, working from light to dark.
Practicing these fundamentals, along with color gradients, will quickly improve your skills and confidence. For a visual guide, we highly recommend checking out this video on fundamental techniques.
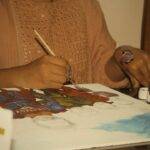
Your First Fun Watercolor Painting Projects
Once you have your basic supplies and a grasp of the fundamental techniques, it’s time to dive into some fun watercolor painting projects! The key here is to start simple, build confidence, and enjoy the process without the pressure of perfection. As Kerrie Woodhouse wisely points out, overthinking can be a major procrastination tool for beginners. We want to encourage you to just pick up that brush and start creating.
These projects are designed to be accessible and enjoyable, helping you experiment with your new skills and find inspiration in everyday things.
Project 1: Meditative Abstract Shapes
Sometimes, the most relaxing watercolor painting projects are the simplest. Painting meditative abstract shapes, like simple circles or geometric patterns, allows us to focus on the movement of the brush and the flow of the paint, rather than worrying about a perfect representation.
To try this:
- Prepare your paper: Tape down your watercolor paper to a flat surface to prevent warping.
- Choose your colors: Select a calming color palette.
- Paint simple circles: Using the wet-on-dry technique, paint a series of overlapping or individual circles. Focus on controlling the brush as you create the round forms. It’s trickier than it looks but very satisfying!
- Experiment with blending: While one circle is still wet, introduce a different color to its edge and watch them softly blend. For crisp edges, let each shape dry completely before adding another beside it.
- Create geometric patterns: Use a ruler to lightly sketch simple geometric shapes like squares, triangles, or rectangles. Fill them in with colors, experimenting with gradients within each shape or letting different colors meet at the edges.
This practice helps improve brush control and understanding of how colors behave, all while providing a wonderfully meditative experience.
Project 2: Simple Botanical Leaves
Nature is an endless source of inspiration for watercolor painting projects, and botanical leaves are a perfect starting point for beginners. They offer beautiful organic shapes and opportunities to practice wet-on-wet and layering.
Here’s how to paint a simple leaf:
- Find inspiration: Look at a real leaf, a photo, or even a houseplant. Notice its shape and the subtle variations in color.
- Sketch lightly: On your watercolor paper, lightly sketch the outline of a simple leaf. Don’t press too hard.
- Wet the area: Using clean water, gently wet the inside of your sketched leaf shape.
- Apply initial color (wet-on-wet): While the paper is still wet, drop in a light wash of green. Watch how the color spreads and softens.
- Add dimension (layering): Once the first layer is completely dry, mix a slightly darker shade of green or a touch of blue. Paint a second, thinner layer to create shadows or define the leaf’s veins. You can also add a hint of another color, like brown or yellow, to mimic natural variations.
- Add details (wet-on-dry): If desired, once everything is dry, use a fine brush and a slightly darker, less watery paint mix to add very delicate vein lines.
For more inspiration, you can find a simple leaf tutorial here.
Project 3: A Dreamy Galaxy Sky
Creating a dreamy galaxy sky is one of our favorite watercolor painting projects because it accepts the unpredictable nature of watercolor and yields stunning results with minimal effort. Plus, these make fantastic handmade bookmarks!
To create your own galaxy:
- Prepare your paper: Cut a strip of watercolor paper for a bookmark, or use a larger piece for a small artwork. Tape it down.
- Wet the area: Thoroughly wet the entire paper surface with clean water.
- Drop in colors (wet-on-wet): Choose 2-3 colors (e.g., deep blue, purple, a touch of pink or black). Drop small amounts of highly pigmented paint onto the wet paper. Watch them bloom and blend. You can gently tilt the paper to encourage the colors to flow.
- Add salt for texture: While the paint is still visibly wet (but not soaking), sprinkle a tiny pinch of coarse salt onto the colored areas. The salt absorbs water and pigment, creating beautiful, star-like patterns and texture.
- Let it dry completely: This is crucial! Do not touch or move the paper until it’s bone dry. Once dry, gently brush off the salt.
- Optional stars: If you want brighter stars, you can use a white gel pen or diluted white gouache paint on a toothbrush (flicked gently) to add tiny white dots.
This project is a wonderful way to experiment with texture and accept the happy accidents that watercolor is famous for.
More easy watercolor painting projects to try
The world of watercolor painting projects is vast and inviting, with countless simple ideas perfect for beginners. Once you’ve tried the projects above, here are a few more to keep your creative momentum going:
- Simple Flowers: Start with basic shapes like circles and ovals, then add petals with soft, wet-on-wet washes. You don’t need to be precise; loose florals are incredibly charming.
- Watercolor Wreaths: Paint a series of simple leaves and flowers in a circular pattern. This is lovely for greeting cards or small decorative pieces.
- Fruit and Vegetables: These are fantastic subjects because their imperfections are part of their charm. A slightly lopsided pear or a capsicum with an extra bump adds personality, not a flaw. They’re glossy, bright, and forgiving.
- Abstract Color Swatches: Simply paint blocks or stripes of color, experimenting with how different hues look next to each other. This is a great way to learn about color theory and practice your washes.
- Handmade Gift Tags: Cut small pieces of watercolor paper into tag shapes. Paint simple designs like a single heart, a small leaf, or an abstract blob. Punch a hole and add string for a personalized touch.
- Watering Can Painting: Try a simple outline of a watering can and fill it with colorful blooms. You can personalize it by changing the foliage or adding different elements.
- Simple Landscapes: Use broad washes for skies and distant hills. Focus on creating a sense of depth with lighter colors in the background and darker tones in the foreground.
- Watercolor for Kids: Many of these beginner projects are also wonderful for children, like using the salt technique for a starry night or simple wet-on-wet shapes.
The goal is not perfection, but exploration and enjoyment.
Tips for a Joyful and Imperfect Art Practice
Starting any new creative endeavor, especially watercolor painting projects, can sometimes bring up a fear of not being “good enough.” We often hold ourselves back, worried about making mistakes or not being inherently “creative.” But our journey through watercolor should be joyful and imperfect, a space for play and self-findy.
The key is to focus on the process over the product. The simple act of painting—mixing colors, watching paint bloom, concentrating on each brushstroke—can have a powerful meditative effect. This is your time to breathe, experiment, and enjoy, without the pressure of creating a masterpiece for a gallery.
Embracing “Good Enough” Art
One of the biggest problems for beginners is letting go of the fear of making mistakes. But in watercolor, there are no mistakes, only experiments! If your pear ends up a little lopsided or your capsicum has an extra bump, who’s to say that’s not how nature intended it? These “imperfections” often add character and a unique touch of personality to your watercolor painting projects.
Even experienced artists make “mistakes” all the time. The beauty of watercolor, with its transparency and fluidity, often allows for happy accidents that can lead to unexpected and beautiful results. Accept the idea of “good enough” art. This means celebrating your efforts, learning from every stroke, and finding joy in the act of creation itself. We are all born creative; it’s about giving ourselves permission to refind that inner artist.
Avoiding Common Beginner Pitfalls
While embracing imperfection is key, understanding common beginner pitfalls can help us avoid frustration and enjoy our watercolor painting projects more.
Here are a few common issues and how to avoid them:
- Muddy Colors: This often happens when colors are over-mixed or when dirty rinse water is used for mixing.
- Fix: Always use two water jars—one for rinsing brushes and one for clean water to dilute paint. Clean your brush thoroughly between colors. Let layers dry completely before adding new ones, especially if colors are complementary (opposite on the color wheel), as mixing them while wet can create a brownish, muddy tone.
- Too Much Water: Too much water can lead to paint running uncontrollably or backruns (blooming effects where water pushes pigment to the edges).
- Fix: Control the amount of water on your brush by blotting it on a paper towel. If paint runs too much in a wet-on-wet area, let the paper dry slightly before adding more color.
- Paper Buckling: Regular paper will warp when it gets wet.
- Fix: Always use watercolor paper. For larger watercolor painting projects, tape your paper down to a flat board with artist’s tape or painter’s tape before you start. This will help it dry flat.
- Uneven Washes: Sometimes, washes can look splotchy or streaky.
- Fix: Ensure your brush holds enough paint and water to complete a stroke. Work quickly and evenly. Practice consistently mixing your paint and water to achieve the desired consistency.
By being mindful of these simple tips, you can steer your early watercolor painting projects with greater ease and confidence.
Frequently Asked Questions about Watercolor Painting
We often hear similar questions from busy moms looking to explore watercolor painting projects. Here are some common queries and our best advice:
How can I find time to paint as a busy mom?
Finding time for any personal pursuit as a busy mom can feel like a luxury, but it’s essential for our well-being. The good news is, watercolor is incredibly flexible!
- Start Small: You don’t need hours. Even 15-minute art sessions can be incredibly beneficial. Set a timer, do a quick sketch, or practice a single wash.
- Keep Supplies Accessible: Have your watercolor kit ready to go on a desk or a small tray. The less setup time, the more likely you are to actually paint.
- Art Journaling: Dedicate a small sketchbook to quick studies, color swatches, or abstract doodles. This is a low-pressure way to practice without the expectation of a “finished” piece.
- Involve the Kids: Many simple watercolor painting projects are perfect for children. Set up a joint art session, and you can both enjoy the creative process.
This isn’t about adding another chore to your list; it’s about carving out precious moments for self-care and creative expression.
What’s the easiest subject for a total beginner to paint?
For absolute beginners, the easiest subjects are those with simple forms and a forgiving nature. We recommend:
- Abstract Shapes: Circles, squares, or organic blobs. These allow you to focus on technique and color mixing without the pressure of realism.
- Simple Natural Elements: A single leaf, a pebble, or a feather. These subjects are readily available for inspiration and allow for beautiful variations in color and texture.
- Fruit and Vegetables: As we mentioned, their bright colors and often irregular shapes make them very forgiving. Cherries, lemons, or simple apples are great starting points.
- Basic Landscapes: Think misty mountains or simple horizons. Use broad washes to suggest forms rather than detailed drawing.
Following a step-by-step tutorial for any of these subjects can also provide structure and confidence.
How do I keep my colors from getting muddy?
Muddy colors are a common frustration for watercolor beginners, but they’re easily avoidable with a few simple practices:
- Use Two Water Jars: This is our golden rule! One jar is for rinsing your brush of excess paint, and the other holds clean water specifically for diluting your paints. This prevents dirty water from contaminating your fresh colors.
- Clean Brushes Thoroughly: After rinsing, gently press your brush against the side of the clean water jar or blot it on a paper towel to remove as much pigment as possible before dipping into a new color.
- Let Layers Dry: Watercolor is transparent. If you layer wet paint over another wet layer, especially if the colors are complementary (like red and green, or blue and orange), they can mix into a dull brown or gray. Always allow a layer to dry completely before applying the next.
- Learn Basic Color Theory: Understanding which colors are analogous (next to each other on the color wheel, like blue and green) and which are complementary can help. Analogous colors tend to mix well and stay bright, while complementary colors create vibrant contrasts when kept separate, but can muddy when mixed.
By following these tips, you’ll achieve cleaner, more vibrant results in all your watercolor painting projects.
Continue Your Creative Journey
We hope this guide has inspired you to pick up a brush and dive into the wonderful world of watercolor painting projects. The benefits extend far beyond creating beautiful art; it’s a powerful tool for relaxation, mindfulness, and self-care in our busy lives. The growing global market for watercolor paints and the consistent increase in online searches for “watercolor painting” prove that more and more people are finding this accessible and soul-soothing hobby.
Every stroke is an experiment, and every painting is a step in your unique creative journey. Don’t be afraid to play, explore, and accept the imperfect beauty of watercolor. We encourage you to start small, find inspiration in the everyday, and allow yourself the joy of creation.
For more ideas and to connect with a community of fellow parents, explore more creative craft ideas for your family. Your creative escape awaits!
The post Watercolor Wonders: Beginner Projects for Beautiful Art appeared first on ModernMom.